Sombriks Has A Plan
How to use git
This is a well covered theme over the internet but it does not harm to put it in my own words. Let's do it.
Installing
On windows machines get it here.
On linux boxes it might be there already. If not, check the package manager of your distro, it will be there.
On macOS you might find it by typing this command on your terminal:
xcode-select --installOh, by the way, there are lots of GUI tools for git. We'll see none of them.
Init, Add, Commit, Log, Checkout
First of all, make a folder. Inside the folder make a text file.
mkdir foobar
cd foobar
echo "hello you" > myfile.txt
The deal with git is that you can memorize forever the folder content. For example:
$ git init
# ...
$ git add myfile.txt
$ git commit -m 'first works version'
[master (root-commit) b49e993] first works version
 1 file changed, 1 insertion(+)
 create mode 100644 myfile.txt
This file now is committed. Every relevant change you do in your files can be secured by a new commit:
echo "hello again" >> myfile.txt
git add . # adds everything in the current folder
git commit -m 'more works'
You can see how many commits you have with git log:
$ git log
commit 5188c9ac3c766b192478640b2835f585168297d1 (HEAD -> master)
Author: sombriks <sombriks@gmail.com>
Date:   Tue Jan 8 12:58:31 2019 -0300

    more works

commit b49e993c0c95e3e8a11bedd14b913e7c7a158cdc
Author: sombriks <sombriks@gmail.com>
Date:   Tue Jan 8 12:52:07 2019 -0300

    first works version
And you can checkout a commit to see things as they used to be:
$ git checkout b49e993c0c95e3e8a11bedd14b913e7c7a158cdc
# lots of scary but harmless things...
$ cat myfile.txt
hello you
$ git checkout master # we'll talk about this later
$ cat myfile.txt
hello you
hello again
Deleting
The easier path to delete files is to actually delete them and add the folder modifications:
$ rm -rf myfile.txt
$ git add .
$ git commit -m "throw works away"
[master 0ef23d7] throw works away
 1 file changed, 2 deletions(-)
 delete mode 100644 myfile.txt
Note that even deleted, the file now lies in the git history, so you can checkout it back if needed.
Branch
When you branch your git repository you're creating something like an alternative reality.
The default branch is called master. You called it before.
Use the following command to create a branch:
$ git checkout -b develop
Switched to a new branch 'develop'
Then start working normally:
$ echo "another works indeed" > myotherfile.txt
$ git add .
$ git commit -m "working branch"
[develop 74ff08d] working branch
 1 file changed, 1 insertion(+)
 create mode 100644 myotherfile.txt
This is how you can see your branches:
$ git branch
* develop
  master
The starred one is 'where you are'. To switch branches:
$ git checkout master
Switched to branch 'master'
Note the lack of the -b argument.
Since we're back on master, we cannot see the works from develop branch.
Merge
At some point we might want to get all commits from a branch and put it on another. It's called merge operation.
Let's get all work made so far on develop and put it on master:
$ git checkout master
Already on 'master'
$ git merge develop
Updating 0ef23d7..74ff08d
Fast-forward
 myotherfile.txt | 1 +
 1 file changed, 1 insertion(+)
 create mode 100644 myotherfile.txt
Remote
So far all this work, commits, branches, merges are related to your machine. The GIT however is distributed, so you can spread all your works over the internet. You can even copy it to another folder, but it's still your machine so what's the point?
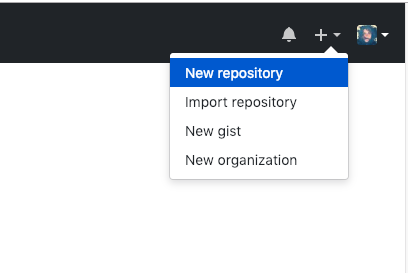
Go to GitHub.com, make an account (if you don't already have) and hit the new repository menu option:
After that, provide required information but DO NOT 'Initialize this repository with a README', since all history about commits and branches are in your folder:

Once you hit the create repository button, you will receive nice hints on what to do next. Add the remote to your repo then push your master branch to it:
$ git remote add origin https://github.com/sombriks/git-mini-crash-course.git
$ git push -u origin master
Counting objects: 11, done.
Delta compression using up to 4 threads.
Compressing objects: 100% (4/4), done.
Writing objects: 100% (11/11), 843 bytes | 421.00 KiB/s, done.
Total 11 (delta 0), reused 0 (delta 0)
To https://github.com/sombriks/git-mini-crash-course.git
 * [new branch]      master -> master
Branch 'master' set up to track remote branch 'master' from 'origin'.
The -u option in the push command tells git to use the 'origin' branch as the
upstream. The preferred remote to pick and send commits.
We call changeset a collection of commits.
This is important because in the daily workflow you won't say which remote and which branch, you will just say that you want push code.
Once you do that, your repo will look like this:

And that's it, your creation is in the internet now.
Clone
To get a copy of your entire repository on another machine you can clone the repo from the GitHub copy now:
$ git clone https://github.com/sombriks/git-mini-crash-course.git
Cloning into 'git-mini-crash-course'...
remote: Enumerating objects: 11, done.
remote: Counting objects: 100% (11/11), done.
remote: Compressing objects: 100% (4/4), done.
remote: Total 11 (delta 0), reused 11 (delta 0), pack-reused 0
Unpacking objects: 100% (11/11), done.
This also sets the origin as the clone address and makes it the upstream remote to send your branches, master by default.
Pull, Push
Once you start to work on repos with remotes, you just do the same as you did: works, new files, delete files, change files contents, then add (or stage) those changes, commit them, merge them... but you will also do this:
$ echo "more work" > newsest-file.txt
$ git add .
$ git commit -m "more work"
[master ed06920] more work
 1 file changed, 1 insertion(+)
 create mode 100644 newsest-file.txt
$ git push
Counting objects: 3, done.
Delta compression using up to 4 threads.
Compressing objects: 100% (2/2), done.
Writing objects: 100% (3/3), 284 bytes | 284.00 KiB/s, done.
Total 3 (delta 0), reused 0 (delta 0)
To https://github.com/sombriks/git-mini-crash-course.git
   74ff08d..ed06920  master -> master
This was just git push because 1) upstream is set to origin/master 2) there
where no new changes on remote origin.
You should first make git pull:
$ git pull
remote: Enumerating objects: 4, done.
remote: Counting objects: 100% (4/4), done.
remote: Compressing objects: 100% (2/2), done.
remote: Total 3 (delta 0), reused 3 (delta 0), pack-reused 0
Unpacking objects: 100% (3/3), done.
From https://github.com/sombriks/git-mini-crash-course
   ed06920..e7d1574  master     -> origin/master
Updating ed06920..e7d1574
Fast-forward
 another-sample.txt | 1 +
 1 file changed, 1 insertion(+)
 create mode 100644 another-sample.txt
Just as push, when you just do pull its like do git pull origin master.
To be fair you can call your remote addresses anything you want, but origin is what you will see on the streets, so get smart!
Common workflows
People use git in many many different ways.
Some are happy with one humble local copy, kept apart from the world as a valuable secret.
Some get one github, gitlab or bitbucket account and push their master branches. And that's it.
Some automate app publishing to happen every time a push happens on master, therefore everyone is working on another branch.
And some branch for very new feature to be created.
To close this thing, i hope this small overview helps you to start.
You will face problems, but at least you know how to start.